|
Lawsuits are unfortunately a part of life, and they can happen at any time – especially when we least expect it. So how can you minimise the chance of it happening to you?
As property investors, we’re arguably more exposed to the possibility of litigation than the population at large simply because we provide a service to the public. You might remember about five years ago, a case presented to the District Court of New South Wales that resulted in a huge judgment. The plaintiff in the case was a tenant who had been injured when his hand broke through the glass on a door at the property he was renting. Ultimately, the court awarded the tenant more than $840,000 in damages. Fair or not, this is what happened – and both the property owner and the property manager were held responsible to pay the claim. Ouch! Granted, things sometimes happen, but there are things we can do to lessen the chance of a tenant option to sue us. Communicate Good communication is an important part of a tenant/landlord/property manager relationship. Misunderstandings can easily balloon into tribunal hearings and court cases. Avoid this by promptly responding to tenant concerns and spelling out what each party is expected to do, and follow up to ensure that all expectations have been satisfactorily met. Document Everything Every communication, whether it be written or verbal, needs to be accurately documented. Facts that need to be documented include the topic (e.g. repairs, lease renewal); date; parties involved (e.g. tenant and property manager’s assistant); solution and date accomplished; follow up date and task (if necessary). Give Notices Provide your tenant with all required notices, such as fire safety, carbon monoxide information, etc., obtaining a signature that the information was received. Provide A Safe Property Ensure your tenants’ safety by keeping the property in top shape. A good rule of thumb: if you would do something to your own residence, such as exterior flood lamps or well-manicured shrubs, then do it for your rentals. Follow Up On Repairs When a tenant calls about a problem that needs repairing, set up a time that’s good for them for you to #inspect# the damage. Once you’ve determined what needs to be done, contact a licensed professional to attend to it, ensuring that it’s done as quickly as possible. After the repairs have been done, review them to make sure they’re done correctly and to your (and your tenants’) satisfaction. Be Available Make sure your tenant has your contact information, and respond quickly to their enquiries. If you plan to go away, let them know well in advance that you’ll be unavailable. However, have an emergency contact person they can reach if necessary. Never Violate Your Tenant's Privacy Always give at least 24-hour notice of your intent to visit the property. Reward Great Tenants Do you have tenants who always pay on time – or even a bit early? Who take great care of your property and have neighbours who love them? Make sure you let them know how much you appreciate them by giving small tokens of your appreciation, such as a nice bottle of wine at Christmas or even movie/theatre tickets. Protection Even if you’ve done everything you possible can to ensure your tenants’ safety and to manage your property as efficiently as possible, things happen and sometimes people feel the need to involve the courts in their disputes. To protect yourself and your investment, make sure your insurance is enough and that it will cover litigation costs should you be sued. It’s also advisable to speak with a financial planner to determine what structures you need to put in place to protect your personal assets or limit your personal liability.  When it comes to building your home, there’s a great deal of work that goes on behind the scenes before you can take the first steps towards constructing the building itself. One important stage in the process and the very first step when it comes to the process of building is excavation. If you’re building a new house, then you most likely included an expense like this in your budget. Excavation isn’t always easy, nor is it a particularly inexpensive step in the process, but it’s one that’s vitally important nonetheless –especially in Sydney Australia, where there’s an abundance of harsh compressed land. Before Excavation: A Surveyor & a GeoTech will be involved in the process of identifying a benchmark, building lines and foundation requirements dependant on the soil. This accomplishes two things; first of all, it enables us to help determine where the ideal building location will be. If the site won’t work or the cost of excavation is too high, our clients can terminate the deal during the inspection period of the transaction, minimizing additional expenses. Based on the results of the soils test, we’ll receive one of the following from the GeoTech:
Excavation begins once we have an approved plan, excavation begins. A professional excavator operator will come in and begin digging. The excavator will use the approved plan in order to know where to dig. The depth that they will dig depends on a number of factors, including the type of foundation, whether there will be a crawl space, and whether there will be a basement. No matter what type of foundation you ultimately choose, it will most likely need to be placed on concrete piers. We can drill down to 3 metres with our auger drive using our 6T Excavator. The type of foundation will be the deciding factor as to how deep the piers ultimately end up. Usually its to until we hit shale. Let’s look at each of these foundation types and how they affect excavation and footer depth now; Slab: This is the most basic of foundation types, as the name suggests it is a simple concrete slab. There is a wide range of options and variables that pertain to the slab foundation, enough for a complete article. Basement: This is by far the most popular type of foundation as it provides a great foundation system with the added benefit of extra storage space or affordable finished living space. There are different types of basements as well; Full basement, Garden Level and Walk out. The basement excavation certainly costs more but when you weigh the cost against the other options and frost mitigation requirements, the basement turns out to give home owners the best bang for the buck. Once the engineer signs off on the soils and condition of the excavation, the process of pouring the foundation can begin. How Long Does It Take? Excavation for a foundation can range from 1 to 3 days, on up to 3 weeks for a basement. Generally, a worst case scenario will involve a rock excavation which is generally charged at $150 per hour due to the wear that occurs to the cutting tools. Most occurrences of rock drilling or rock excavation occur in the north shore and the central business district of Sydney. Once the dig is complete, we’ll then have it backfilled with non-expansive, or ‘structural fill soils,’ although in some cases, the engineer will allow the soil to be removed, conditioned (wetted down), compacted, and returned. How Much Does It Cost? The cost of excavation itself can vary considerably depending on the contractor that you use, as well as the extent of the job. For instance, excavating a patch of land that’s easily accessible and contains few trees is far cheaper than clearing a remote patch that contains large boulders that are stuck in clay. Generally, though, you can expect to spend between $3,000 to $60,000 on excavation costs in most areas. Be sure to obtain a few different estimates from excavation companies up front. Also, keep in mind that extra excavation, hauling away dirt, disposal fees, and bringing in new soil, can all add to the cost. We hope this article was helpful to you - 6 Axis Pty Ltd - Excavation for Sydney.  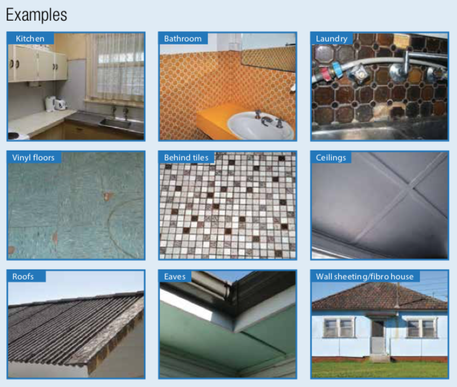 Can I remove asbestos myself? DIY asbestos removal is not recommended and in some states is not legal. In the ACT, all asbestos removal work must be carried out by a licensed asbestosremovalist. In all other states and territories, a non-licensed person is allowed to remove non-friable asbestos as long as the area is no bigger than 10m² If you do decide to remove 10m² or less of non-friable asbestos... Do-it-yourself DIY WORK
Where am I likely to find asbestos? Building products made from asbestos were considered very versatile and were easily moulded, shaped, cut, drilled and painted. This made them a popular choice and their use was widespread, including in many homes and workplaces. Australia was one of the highest users per capita in the world up until the mid-1980s. Approximately one third of all homes built in Australia contain asbestos products. Outside the house Externally, asbestos products were commonly used for roof sheeting and capping, guttering, gables, eaves/soffits, water pipes and flues, wall sheeting, flexible building boards and imitation (false) brick cladding. They were also used in fencing material and in the construction of carports, garages, bungalows, outhouses, garden surrounds and sheds. Inside the house Asbestos products were often used inside houses as wall sheeting, particularly in wet areas such as the kitchen, bathroom, toilet and laundry, and were also commonly used as ceiling sheeting. Asbestos was also used in plaster patching compounds, textured paint, switchboards and vinyl floor tiles and sheeting. Asbestos can be found in some older forms of insulation used in domestic heaters and stoves. Asbestos felt was used as a backing for many vinyl and linoleum sheet floorings and can easily become loose when the floor covering is damaged or removed. What is the difference between non-friable and friable asbestos? Non-friable asbestos (also known as bonded asbestos) means that the asbestos fibres in the product are held within a solid matrix (e.g. cement in asbestos cement sheeting) and are less likely to become airborne, unless the product is damaged or has deteriorated. Asbestos fences, roofs, vinyl floor tiles and asbestos cement sheeting are examples of non-friable asbestos products. Friable asbestos products contain loosely packed asbestos fibres and can be crushed easily in the hand. Examples of friable asbestos products include asbestos rope, insulation, pipe lagging and fire blankets. It is important to remember that over time, non- friable materials may become friable as the bonding agents holding asbestos fibres in place deteriorate. How can I tell if it is asbestos? Confirming that materials contain asbestos may require talking to or hiring a professional. There is no conclusive on-site test for the presence of asbestos. Asbestos content can only be determined through laboratory testing following sampling. However, the age of the building or refurbishment may be used as an indication. If the property was constructed before 1990 it is likely it will contain some form of asbestos. If you are unsure whether the materials you are planning to remove contain asbestos, it is best to assume asbestos is present until it can be confirmed or ruled out. Professionals who can assist with identifying asbestos around the home include:

Collimation Method; It consist of finding the elevation of the plane of collimation ( H.I.) for every set up of the instrument, and then obtaining the reduced level of point with reference to the respective plane of collimation.
2.Rise and Fall Method; It consists of determining the difference of elevation between consecutive points by comparing each point after the first that immediately preceding it. The difference between there staff reading indicates a rise fall according to the staff reading at the point. The R.L is then found adding the rise to, or subtracting the fall from the reduced level of preceding point. Arithmetic check Sum of B.S. – sum of F. S. = sum of rise – sum of fall = last R. L. – first R.L. This method is complicated and is not easy to carry out. Reduction of levels takes more time. Visualization is necessary regarding the nature of the ground. Complete check is there for all readings. This method is preferable for check levelling where number of change points are more. Basic definitions Bench Mark and Reference Datum In order to calculate the heights of points a datum is required, i.e. a reference level. This is usually the mean sea level. For this purpose, the use of Bench Marks is necessary, and these are classified as follows:Bench Mark (BM) – a point with known height above mean sea level (or other reference datum). These are permanent points (e.g. unchanged by weather conditions) and are provided by the Department of Lands and Surveys. Reduced Level The height of any target point is referred to as Reduced Level (RL), because it is reduced to a known datum. Back-sight (BS) First staff reading taken immediately after setting up the instrument. Foresight (FS) last staff reading taken before moving the instrument to another location. Intermediate sight (IS) All readings taken between a BS and a FS. Common sources of errors in levelling 1. Instrument not correctly levelled. 2. Telescope not correctly focused. 3. The wrong cross-hair reading recorded (e.g. top instead of middle). 4. Staff incorrectly read or not held vertical. 5. Staff incorrectly booked. All the above are blunders cannot be corrected unless the work is repeated! 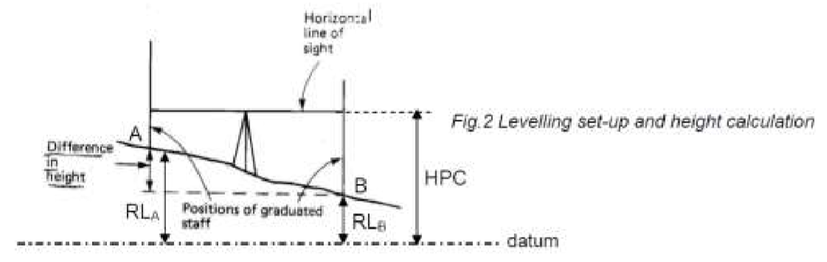 Levelling operations Now consider Figure 2. The level is set up as shown, and using the staff at points A and B, height readings are recorded. This is just the height read through the telescope horizontal line of sight (known as line of collimation). If no reduced level is known only the difference in height can be found between A and B, not their absolute levels. Staff Reading at A is 1.135m Staff Reading at B is 1.875m If we know that RLA = +120.000m (above datum), then RLB = 120.00 – 0.740 = +119.260m i.e. a fall from A. If RLB was known we would calculate a rise in level. Hence, the following can be defined: Rise – staff reading is less than previous reading. Fall – staff reading is greater than previous reading. Experiment (Rise & Fall method): Aim: To determine the required level of given points by Rise and fall method Apparatus Required: Automatic level, Tripod and Levelling staff 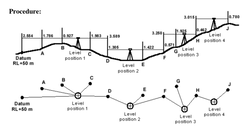 Procedure:
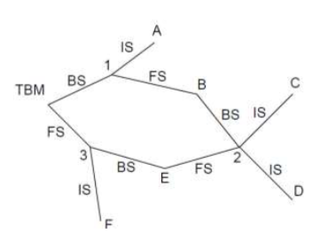 Field procedures for leveling For vertical control the level survey should start and close on points of known height (same point or different). If the survey starts and closes on the same point (e.g. a TBM), as below, this is termed as a closed level survey. RL(TBM) = +430.000m Instrument stations: 1, 2, 3. Target points: TBM, A, B, C, D, E, F. 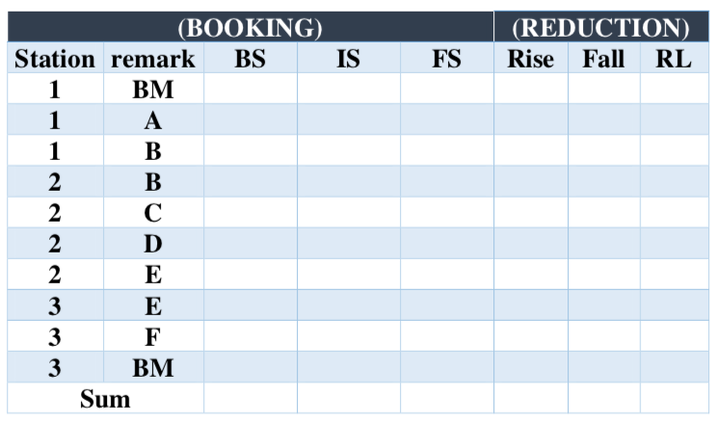 As consumers we always like to know we're getting value for money, not always about the cheapest, but rather the best product or service for each application. The comparison chart below illustrates the difference between each excavator, comparing apples with apples, you will find it easy to reach the conclusion which is the best value out there. So when hiring an excavator, make sure you get a machine and not a toy! 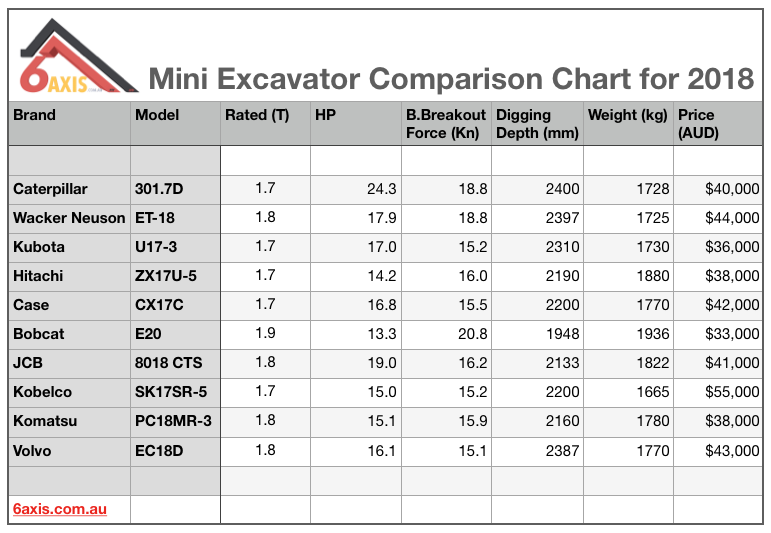 Made in Germany It's a well known fact within the building and excavation industry that 'Bucket Breakout Force' is the number to look for to see how powerful it can actually dig, because this is why we got an excavator in the first place right? the other important factors are the digging depths and the total brut power of the excavator to decrease the time spent on digging and to actually get on with building. So I put it out there, if you're renting another brand over the CAT for the same money, you're simply not getting the value you deserve! Visit 6axis.com.au to book your next excavator hire.  New innovations in alternative building materials are now providing the market with more options in lightweight construction that are becoming more accessible and affordable. Lightweight construction materials have the potential to improve the sustainability and affordability of homes, depending on the location and climate they are built-in. This is both at an individual home and on a higher density scale. Lightweight construction materials include timber or lightweight steel framing, structural insulated panels, pre-fabricated products and even polystyrene building products. These materials generally have a lower embodied energy rating than heavyweight materials and may result in lower overall life cycle energy use. Lightweight materials can also respond rapidly to temperature changes and cool rapidly overnight in warmer climates. Materials can be cheaper to produce and transport, particularly to remote locations and they often require less preliminary site works. Different products can also provide the opportunity for increased design flexibility. For example, polystyrene blocks allow you to shape and finish the material in a range of different and innovative ways. Polystyrene also provides excellent insulation and can be used for walls, roofs and under floors. A testament to the rise of alternative building materials is the display home located within the 2017 UDIA Environmental Excellence Award winning estate, Osprey Waters by Mirvac. The home was designed by architect Sid Thoo and has been built with alternative, lightweight building products including structural insulated panels and recycled hardwood panelling. On a larger scale, developer Lendlease recently completed the first engineered timber office building in Australia. The International House Sydney, located in Barangaroo was constructed from cross-laminated timber (CLT) and glue laminated timber (Glulam). According to the developers, CLT has a lower carbon footprint than other building materials, the production process produces zero waste and timbers are sourced from certified sustainably managed forests. It is exciting to see the development of a range of innovative products that are providing an increasing choice to the building and development industry so they can deliver more affordable and sustainable products to the market.Using an Excavator in Sydney, NSW, actually Australia wide does not require any form of licence due to the introduction of the WHS Act 2011. In 2011, the Government introduced the Work Health & Safety Act, superseding existing legislation and making it much easier for workers to responsibly use different kinds of plant equipment. A certification is no longer needed to operate an excavator and many other kinds of equipment formerly covered by the EPC, but that doesn’t mean you can just hop on and start digging. There’s several aspects you’ll need to consider, as both an operator and manager of a jobsite. Management Responsibilities and PCBUIn the eyes of the law, the safe and appropriate use of plant equipment in general falls into the roles of responsibility and competency. The Person conducting a business or undertaking(PCBU) is ultimately responsible for what happens on the job site. For work operations that no longer require a license, they must still adhere to the following guidelines to ensure job sites and workers are safe:
 The Future of Construction in Australia The Future of Construction in Australia Will construction robots and 3D printing replace construction workers?
Only time will tell, but construction robotics and 3D printing have come a long way in a short period of time. We may see more buildings being built with robotics and 3D printing in the near future. They can be cheap to build and take a fraction of the time construction workers need to take. The technology is advancing quickly and is used in the United States, Europe, China, Australia and other countries. As the technology is perfected, prices will come down and we may see construction workers replaced by robots and 3D printing. Some construction workers will still be needed to install windows and doors, but robots may eventually be able to do those jobs, too. It may take 10 to 20 years for construction robots and 3D printing to take over the construction industry, but in the meantime, young workers should consider their priorities. Perhaps they should choose CAD computer courses instead, because input into computers is needed to construct a home or larger building with CAD drawings. We have been building homes for 6000 years using traditional methods, but robotics and 3D printing seem to be the wave of the future. Time will tell, but considering the advances made, it is only a matter of time before construction workers are replaced by robotics and 3D printing. Future generations of construction workers may have to rethink their priorities. While construction robots and 3D printing won't reach all parts of the world, they will eventually take over in large cities and new suburbs. 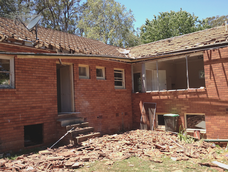 There are a bunch of criteria that must be met before a person can obtain an owner-builder permit.
Under the Home Building Act 1989, a person can get an owner-builder permit if:
A person must:
When is an owner-builder permit not required? An owner-builder permit is not required when:
The information below is intended to be used as a guide only and specifically tailored for Building Class 1 & 10. If you are constructing a staircase in Class 2-9 Building, other regulations suiting your class of building may be required. When designing your staircase you will need to follow the current Building Code of Australia. Staircases and Balustrades for use externally or between habitable rooms in residential buildings 1&10 can be found in section 3.9.1 Stair Construction and 3.9.2 Balustrades. Other references to staircase construction can be found in the Australian Standard AS1657 Section 4 – Stairways. Below is an overview of this information to help you design your staircase to suit these regulations. NCC Part 3.9.1 – Staircase Construction General Requirements – Staircase used in habitable rooms or used externally must comply with the Building Code of Australia Part 3.9.1. All areas not specified in Building Code of Australia should be referenced in the Australian Standard AS1657 Section 4. Staircases to storage areas or un-habitable rooms such as attics can be constructed outside the Building Code of Australia though must comply too the Australian Standards AS 1657. NCC Part 3.9.1.3 – Staircase Construction
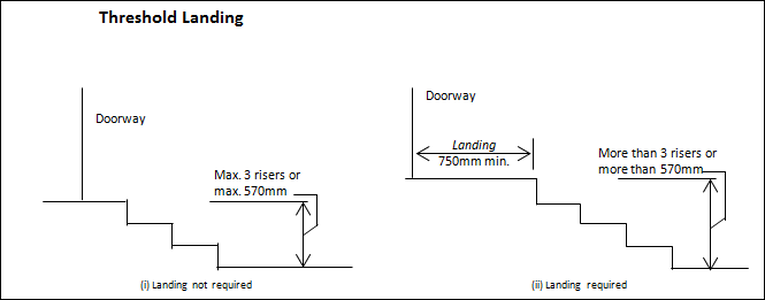 AS 1657 – 4.1 WIDTH AND ANGLE OF SLOPE
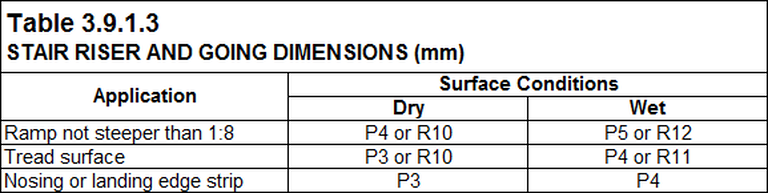
 3.9.1.4 Stair ConstructionSlip Resistance
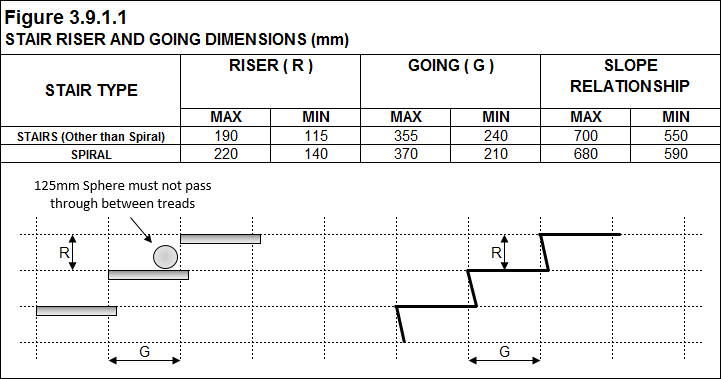
 AS 1657 – 4.3.1 Rises and goings
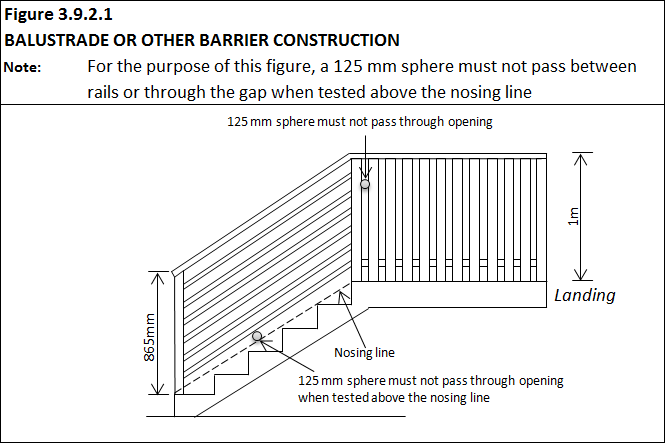
A continuous handrail must be provided along the side of any stairway or ramp. A balustrade is required to any staircase A balustrade is required to any staircase, balcony, ramp, hallway, veranda, mezzanine or bridge were the potential to fall from the above mentioned area is 1000mm or greater to the surface below. Part 3.9.2.3 – Balustrades or other barrier construction
 Staircases to storage areas or un-habitable roomsAny staircase or balustrade to a storage area or un-habitable rooms must comply too all other regulations above apart from NCC Part 3.9.1.2. The Staircase rise and goings for an un-habitable room must be constructed in accordance with AS 1657 – 4.2.1. AS 1657 – 4.3.1 Rises and goings
Disclaimer
Every reasonable effort is made to ensure that the information provided on this website is accurate, however no guarantees for the currency or accuracy of information are made. 6 Axis Build Pty Ltd's website and material relating to information, products and services (or to third party information, products and services), is provided ‘as is’ and is not to be held accountable under any circumstances for the accuracy or currency of the information. 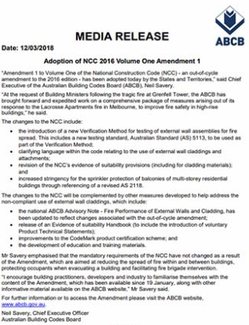 “Amendment 1 to Volume One of the National Construction Code (NCC) - an out-of-cycle amendment to the 2016 edition - has been adopted today by the States and Territories,” said Chief Executive of the Australian Building Codes Board (ABCB), Neil Savery.
“At the request of Building Ministers following the tragic fire at Grenfell Tower, the ABCB has brought forward and expedited work on a comprehensive package of measures arising out of its response to the Lacrosse Apartments fire in Melbourne, to improve fire safety in high-rise buildings,” he said. The changes to the NCC include:
 Background
At its meeting on 19 February 2016, the Building Ministers’ Forum (BMF) agreed to the development and implementation of a range of measures to help address risks associated with external cladding products on high rise buildings. This included a National Advisory Note on the subject that was issued in August 2016. The purpose of the National Advisory Note is to provide guidance on interpreting the National Construction Code (NCC) relating to the fire performance of external walls. It aims to assist practitioners in future decisions on product selection, installation and certification. After the Grenfell Tower fire in London that occurred in June 2017, the BMF directed the ABCB to ‘expedite progress in the implementation of measures through the NCC that will prevent the non-compliant use of cladding from occurring in the future.’ Given this direction, the range of measures that involved changes to the NCC were progressed through an out-of-cycle NCC amendment (NCC 2016 Volume One Amendment 1) that has effect from 12 March 2018. This Advisory Note has been updated to reflect changes made to the NCC fire safety provisions by this amendment. Introduction Performance Requirement CP2 of NCC Volume One requires, among other things, that a building must have elements that will avoid the spread of fire in a building and between buildings, in a manner appropriate for that building. This requirement can be met, in part, under a Deemed-to-Satisfy Solution for buildings of Type A and Type B construction by non-combustible external walls (C1.9). A non-combustible external wall inhibits fire spread via the external wall of the building, thereby contributing to a building’s compliance with Performance Requirement CP2. This Advisory Note provides information to help clarify the application of Deemed-to- Satisfy Provisions and Verification Method relating to the fire performance of external walls (including cladding products) of buildings of Type A and Type B construction. This clarification is predicated on the intent of Performance Requirement CP2 (in part); that external walls (including cladding products) must not contribute to the spread of fire in a building and between buildings. Specifically, the following items are addressed:
Advisory Note: Fire Performance of External Walls and Cladding
Under the Deemed-to-Satisfy Provisions of NCC Volume One, external walls of buildings of Type A and Type B construction must be constructed wholly of materials that are not deemed combustible as determined by testing in accordance with AS 1530.1 (A1.1 – definitions of ‘combustible’ and ‘non-combustible’ and C1.9). In the case of an external wall that is required to have no fire rating, the external wall must still be non-combustible. Therefore building components determined to be part of an external wall in buildings of Type A and Type B construction must be non-combustible under a Deemed-to- Satisfy Solution, unless the requirements of C1.9(d), C1.9(e), C1.10 and C1.14 apply. The purpose of these Deemed-to-Satisfy requirements is to inhibit the spread of fire via the external wall of a building as required by Performance Requirement CP2. 1.2. What is an external wall? The term ‘external wall’ is defined in NCC Volume One as ‘an outer wall of a building which is not a common wall’. A ‘common wall’ is defined in NCC Volume One as ‘a wall that is common to adjoining buildings’. A building element is considered to be part of an external wall if it is integral (i.e. is not ancillary) to the construction of the wall. For example, the following elements are considered to be part of an external wall:
Advisory Note: Fire Performance of External Walls and Cladding 1.3. What is an ancillary element?1.3.1. Defined term A definition for ‘ancillary element’ has been introduced in NCC Volume One. It is defined as ‘an element that is secondary to and not an integral part of another element to which it is attached’. It is necessary to exercise judgement when assessing whether an element is ancillary or integral to another element. For example, a sunshade that is auxiliary in nature can be considered to be ancillary to an external wall. However, a protrusion of a wall near a window that also acts as a sunshade may be considered integral to the wall. 1.3.2. Permitted ancillary elements C1.14(a) permits any ancillary element that is non-combustible, as determined by testing in accordance with AS 1530.1, to be fixed, installed or attached to the internal parts or external face of an external wall required to be non-combustible. The ancillary elements listed in C1.14(b) to (m), even though combustible, can also be fixed, installed or attached to an external wall required to be non-combustible, provided they comply with any specified limitations or conditions. Some of these limitations or conditions are explained in sections 1.3.3 and 1.3.4 below. It should be noted that–
Advisory Note: Fire Performance of External Walls and Cladding fixed, installed or attached to an external wall required to be non-combustible where the sign–
Advisory Note: Fire Performance of External Walls and Cladding fire-resisting covering in a manner that impairs its performance, thereby reducing the fire-resistance level (FRL) of the building element. Specification C1.1 Clause 2.4 only applies to the method of attachment, not the component being attached. 2. Bonded laminated materials subject to C1.9(e)(vi) C1.9(e) contains a list of materials that, although combustible in entirety or part, may be used wherever a non-combustible material is required. Specifically C1.9(e)(vi) permits the use of bonded laminated materials where:
Australian Standard AS 2118.1 specifies requirements for the design, installation and commissioning of automatic fire sprinkler systems in buildings. The 2017 edition, including Amendment 1, of AS 2118.1 includes changes to the requirements for sprinkler protection of covered balconies. Covered balconies must now be sprinkler protected if they are more than 6 m2 in floor area or are greater than 2 m in depth when measured from the external wall. Under the previous edition, both conditions needed to be exceeded before sprinklers were required. This is in recognition that, particularly in residential buildings, balconies can often be used for Advisory Note: Fire Performance of External Walls and Cladding storage, which can be the source of or contribute to the spread of fire via the external wall of a building. NCC Volume One references the 2017 edition, including Amendment 1, of AS 2118.1. The 1999 edition of AS 2118.1 has been retained for a transitional period ending on 11 March 2019, however Clause 5.6.13 of the 1999 edition must be replaced with Clause 5.9.10 of the 2017 edition. Therefore, the increased level of stringency for the sprinkler protection of covered balconies has been adopted, even when using the 1999 edition of AS 2118.1. 4. Verification Method for testing of external wall assemblies for fire spread (CV3) 4.1. Verification Method CV3 Verification Method CV3 enables verification of the fire performance of external wall systems against the relevant Performance Requirements of the NCC. CV3(b)(i) requires that an external wall system be tested in accordance with Australian Standard AS 5113. AS 5113 is described in section 4.2 below. In addition to testing to AS 5113, CV3 requires the external wall system to be verified against CV1 or CV2, as well as meeting certain other fire safety measures, including ones specific to buildings of Type A and Type B construction. These measures are imposed in recognition that an external wall system tested to AS 5113 may contain combustible elements that still present a risk that needs to be mitigated in order to inhibit the spread of fire via the external wall of a building as required by Performance Requirement CP2. Some of these conditions are discussed further in 4.3-4.5 of this Advisory Note. It should be noted that CV3 is one method of verifying compliance with the relevant Performance Requirements. It need not be used if a Deemed-to-Satisfy Solution is proposed or if using another method of verifying compliance with the relevant Performance Requirements, as specified in A0.5 of NCC Volume One. 4.2. Australian Standard for external wall assemblies (AS 5113) The Australian Standard AS 5113 sets out the procedures for the fire propagation testing and classification of external walls of buildings according to their ability to limit the spread of fire via the external wall and to adjacent buildings. AS 5113 is based on international standards and adopts testing criteria prescribed in ISO 13785.2 and BS 8414 Parts 1 and 2. AS 5113 provides the option for an external wall to be tested to either ISO 13785.2 or BS 8414 Parts 1 and 2. Advisory Note: Fire Performance of External Walls and Cladding The specimen or form of construction being subject to the test needs to be representative of the proposed on-site installation, including any cavities and cavity barriers, treatment of penetrations and fixing methods. 4.3. Classification EW and cavity barriers For an external wall system to be used under CV3, CV3(b)(ii) requires an EW classification as determined in accordance with AS 5113. Under CV3(b)(iii), if the external wall system contains a cavity, it must have cavity barriers at the perimeter of each floor and these cavity barriers must have been included in the external wall system tested to AS 5113. The intent of specifically requiring cavity barriers at the perimeter of each floor is to minimise the risk of fire spread between floor levels through concealed spaces within the external wall. 4.4. Buildings of Type A construction In a building of Type A construction, in order to comply with CV3:
Advisory Note: Fire Performance of External Walls and Cladding 4.5. Buildings of Type B construction There are two options when using CV3 for a Class 2, 3 or 9 building of Type B construction. The building must either be protected throughout by a sprinkler system complying with Specification E1.5 or have any openings in the external wall separated by a slab or other horizontal construction. The slab or horizontal construction must comply with the requirements of C2.6(a)(iv), as for buildings of Type A construction. A Class 5, 6, 7 or 8 building or Class 4 part of a building, that is required to be of Type B construction, need not be provided with additional measures. 5. CodeMark Australia or CodeMark Certificates of Conformity A current Certificate of Conformity issued under the ABCB’s voluntary CodeMark Australia or CodeMark Scheme is evidence that a building material, method of construction or design fulfils specific requirements of the NCC. The NCC refers to both the current CodeMark Australia Scheme, which was progressively implemented from 1 August 2017, and the previous CodeMark Scheme. The continued reference to the previous Scheme recognises that Certificates of Conformity issued under it may still be valid forms of evidence of compliance with the NCC. Currently there are a number of external wall products on the market, including some aluminium composite panels that have a CodeMark Certificate of Conformity. Before relying on a CodeMark Australia or CodeMark Certificate of Conformity, users of products and systems should be mindful of the information on the certificate including:
All building work must comply with the requirements of the Building Code of Australia (BCA). The BCA Volume 1 and 2 are part of the National Construction Code (NCC) series published by the Australian Building Codes Board. The BCA changes each year, so it can take time to keep up to date with the requirements that apply to new homes and renovations. The BCA also makes reference to several Australian Standards and these also change from time to time.  |
6 Axis Pty LtdAustralian standards are amongst the best in the world, so follow them! Archives
July 2019
Categories |


 RSS Feed
